Categories
arts how to identity

Art Education Lesson on Identity Using Color Swatches

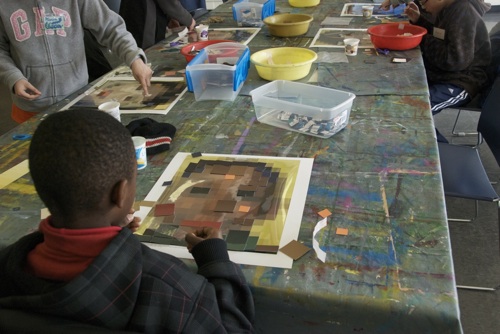
Students glue squares of color on paper to represent faces

Justine Bursoni is a graduate student in art education at the University of Illinois Urbana-Champaign and an editor for the online magazine Smile Politely. She came across my Self-Portrait art piece online and wanted to include it in a lesson plan for a group of fifth and sixth grade students. She asked how I created my piece, and after giving her some tips, she had her students create their own paint swatch portraits.

“During the lesson,” Justine wrote in email, “the students were quick to note how identity comes in different forms, parts of identity can be shared… but mostly, one’s identity is unique and multi-faceted and how all should be recognized and tolerated.” It’s humbling to have my work aid that learning process, and even more humbling to be included in the list of self-portraits she used in her lesson plan:

I also want to thank Justine for allowing me to post her PowerPoint presentation and lesson plan. The PowerPoint notes include her comments on the students’ reactions:

In the vein of open collaboration and online sharing, I put together some notes from our email conversation to provide a list of steps to help others create their own pixelated portraits.

How to Build a Portrait Out of Square Blocks of Color

In my case, I used Photoshop to create a reference image first. For best results, choose an image where the face has a solid color background. You’ll want to follow these steps in Photoshop to get the right result. These steps assume you’re printing the reference image on a standard 8.5×11 inch sheet of paper.

Photoshop Instructions

  • Open and Crop: Open your image in Photoshop. Using the Crop Tool, crop it down to just the face. For this exercise, hold the Shift key while using the Crop Tool to make the crop a perfect square.
  • Reduce to Pixels: Go to Image Size (on the top menu, Image > Image Size). Under Pixel Dimensions, change the units to “pixels” and adjust the width and height to 8 for both. This will end up giving you an 8×8 grid of one-inch squares. Important: Make sure the check boxes for both Resample Image and Constrain Proportions are checked. Select OK.
  • Set Document Size: Your image is now 8×8 pixels. But you still need to make a second adjustment to the image settings before it can be printed correctly. Go to Image Size once more. Important: Uncheck the Resample Image check box. Under Document Size, set the units to “inches,” type in 8 for width and 8 for height. Select OK.
  • Print: Everything is done and you’re ready to print. From the File menu, select Print :)

The final step in creating your pixelated portrait depends on your eye to match the colors. One tip I can offer is that the “value” or black and white levels of each color are more important to recognizing the final image than the “hue” of the color itself. For people to recognize the original image, it’s more important that it have the right amount of contrast than perfectly matching the nuances of each color.

If you do use this process to make your own, I’d love to see your project. If you have a place to upload images, post a link and describe your project here in the comments. Otherwise, send me a note and I can help you post it online.

Special thanks again to Justine for allowing me to publish her class materials and for sending the photo. Seeing that image of them working on their self-portraits puts a huge smile on my face. It’s truly rewarding to see an idea I had almost seven years ago come back to life in the hands of these young minds.
Categories
citizenship how to photo politics video

Guide to Shooting Video or Taking Photos at the Polls

I’ve taken my camera with me to vote for the last several elections resulting in both good and bad experiences. When San Diego used touch-screen machines for the first time, I was able to get a shot using my digital SLR. On another election day, I was stopped and aggressively questioned by a poll worker for trying to take a cellphone photo.

Here’s the problem. The legality of cameras inside polling places isn’t black and white; the laws vary state by state. Plus, some poll workers have only received basic training and will apply their own judgement. The Citizen Media Law Project suggests four things to avoid getting yourself into trouble: follow the rules, be discreet, don’t interfere with voters or the process, respect the buffer zone.

In California, election codes aren’t particularly clear. They prohibit recording within 100 feet of anyone entering or exiting the polling place with the intent to dissuade others from voting. This is where the above guidelines come in; stay low-key and they’ll likely leave you alone. I spoke with the San Diego County Registrar of Voters and they said photography and video will be allowed up to 25 feet away.

While inside the polling area, California Elections Code says you must be in the process of voting (i.e. not using a camera), are limited to 10 minutes, and can’t show your vote to others (i.e. not documenting your vote). While it doesn’t specifically state “no cameras allowed,” legal precedent hasn’t cleared up the specifics. Government officials err on the side of caution. The California Secretary of State’s office says it has “historically taken the position that use of cameras or video equipment at polling places is prohibited, though there may be circumstances where election officials could permit such use.” When I spoke to the San Diego County Registrar of Voters, they said they won’t allow cameras inside the polling place except for credentialed journalists.

From a certain angle, this all seems very oppressive. This is a free country and I should have the right to video my vote, right? Yes, but other voters should also have the right not to be surveilled while voting. Poll workers are commissioned to protect the vote and can kick you out, even calling the police if you cause enough of a disturbance. This can all be avoided by sticking to the suggestions mentioned above. Pay attention and be careful not to record other people unwillingly.

Publish Your Photos and Videos on Election Day

  • YouTube and PBS have partnered with Video Your Vote to gather first-hand accounts on election day. They’ve arranged the videos on a map to note voter intimidation and other problems at the polls.
  • The New York Times’ Polling Place Photo Project collects images to create “an archive of photographs that captures the richness and complexity of voting in America.”
  • Video The Vote is a watchdog group organizing people to document voter suppression and other problems.
Categories
download food history how to travel video

How to Make Tequila: Tour of Casa Herradura

On our last trip to Guanajuato (November 2006), we took a detour from Rosario’s home state and headed to Amatitán, Jalisco for a tour of Casa Herradura, makers of Herradura and Jimador tequila. Rosario shot the tour with her new video camera while I took photos.

Categories
download food how to video

Torta: The Making Of

In honor of a new year, I’m going to try and commit to producing more for this site. The bar has been set pretty low with monthly updates for the past year or so. Hopefully I can find the time to do what I’m hoping to do. Ok, here goes:

This is a video of me making a torta. There are plenty of ways to make tortas and this is one option if you’re hungry. All the ingredients were purchased at a Mexican market called Pancho Villa Farmer’s Market here in San Diego.

Ingredients (estimated cost $2.54 for two tortas):

Categories
how to memories

Kill Cockroaches With Boric Acid

This is a response to this post about pesky cucarachas:

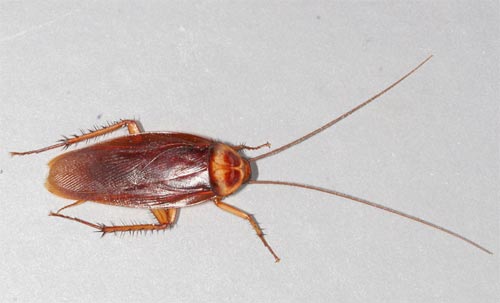
American Cockroach

Living in a small rustic house with three (sometimes five) college guys in Abilene, Texas, I wasn’t sure who was to blame for the cockroaches. Things weren’t exactly kept clean. But one summer, I stayed to work while others left town. The roaches didn’t leave with them.

I happened to run into the landlord and I mentioned the bugs. His response was unexpected. “Yeah, but don’t worry. They’re tree roaches. They just come inside to look for water.” He went on to explain that the typical cockroaches people worry about are a different, smaller kind. They get into your food, but these don’t.

To get rid of them, he suggested a unique attack. Let’s call it the banana borax blitz:

  • Step 1: Chop up a banana and leave it outside near where you think they might be coming inside.
  • Step 2: After midnight, go outside to check the banana. You should find more cockroaches than you ever wanted to see in one place.
  • Step 3: Lightly dust them with borax, or powdered boric acid. You can buy it at most grocery stores.
  • Step 4: Panic as they scatter. Beware, these things can and fly when disturbed!

When cockroaches clean themselves, they eat the powder. Death is swift. I actually watched a few slowly crawl away and flip over with a kind of cockroach kabuki gesture.

It turns out boric acid is well documented for killing roaches (although others suggest a more subtle approach). Four of the top 10 results on Google are from .edu’s.

Categories
how to language

How to Type Spanish Accents Using an English Layout Keyboard

This is old news to anyone who types at all in Spanish, but I wanted to post a reference for typing accented characters. There are a few ways to make them; it depends on your computer. These are only the most common characters. You might need one from another Spanish dialect.

Windows: Press and hold the ALT key. While holding ALT, type in the numbers associated with each letter. After you’ve typed in the numbers, release the ALT key and the character appears:

á = ALT + 160

é = ALT + 130

í = ALT + 161

ñ = ALT + 164

ó = ALT +162

ú = ALT + 163

ü = ALT + 129

¡ = ALT + 173

¿ = ALT + 168

Mac: Press and hold the OPTION key, and while holding OPTION, press “e.” Release both keys and type the letter you want accented. Note that for the tilde, umlaut/diaeresis and upside down exclamation/question marks it’s slightly different:

á = OPTION + e — a

é = OPTION + e — e

í = OPTION + e — i

ó = OPTION + e — o

ú = OPTION + e — u

ñ = OPTION + n — n

ü = OPTION+ u — u

¡ = OPTION + 1

¿ = OPTION + SHIFT + ?